Owen


  • Home

  • Tags

  • Categories

  • Archives

  • Search

dogs_vs_cats学习

Posted on 2019-01-18 | In 深度学习框架学习 | | Visitors:

参考

任务

  • 重新训练一个小网络
  • 使用预训练模型得到的特征
  • 微调预训练模型

  • fit_generator训练

  • ImageDataGenerator做实时的数据增强
  • layer freezing 和 模型 fine-tuning

目录设置和数据集划分

1
2
3
4
5
6
7
8
9
10
11
12
13
14
15
16
17
18
19
20
21
22
23
24
25
26
27
28
29
30
31
32
33
34
35
36
37
38
39
40
41
42
43
44
45
46
47
48
49
50
51
52
53
54
55
56
57
58
59
"""
data/
train/
dogs/
dog001.jpg
dog002.jpg
...
cats/
cat001.jpg
cat002.jpg
...
val/
dogs/
dog001.jpg
dog002.jpg
...
cats/
cat001.jpg
cat002.jpg
...
"""
import shutil
import os

path_list = ['./data/val','./data/train/dogs','./data/train/cats','./data/val/dogs','./data/val/cats']

def make_path(path):
if not os.path.exists(path):
os.mkdir(path)
for i in path_list:
make_path(i)

filenames = os.listdir('./data/train/')
cats = []
dogs = []
for x in filenames:
if x[:3]=='cat':
cats.append(x)
else:
dogs.append(x)

train_cats = cats[:12000]
train_dogs = dogs[:12000]

val_cats = cats[12000:]
val_dogs = dogs[12000:]

def mv_img(file,old_folder,new_folder):
for i in file:
path = os.path.join(old_folder,i)
shutil.move(path,new_folder)

file = [train_cats,train_dogs,val_cats,val_dogs]
old_folder = ['./data/train','./data/train','./data/train','./data/train']
new_folder = ['./data/train/cats/','./data/train/dogs/','./data/val/cats/','./data/val/dogs/']

folder =list(zip(file,old_folder,new_folder))
for f,o,n in folder:
mv_img(f,o,n)

数据预处理和数据增强

keras.preprocessing.image.ImageDataGenerator class

  • 训练的时候可以标准化
1
2
3
4
5
6
7
8
9
10
11
12
13
14
15
16
17
18
19
keras.preprocessing.image.ImageDataGenerator(featurewise_center=False,
samplewise_center=False,
featurewise_std_normalization=False,
samplewise_std_normalization=False,
zca_whitening=False,
zca_epsilon=1e-6,
rotation_range=0.,
width_shift_range=0.,
height_shift_range=0.,
shear_range=0.,
zoom_range=0.,
channel_shift_range=0.,
fill_mode='nearest',
cval=0.,
horizontal_flip=False,
vertical_flip=False,
rescale=None,
preprocessing_function=None,
data_format=K.image_data_format())
  • featurewise_center:布尔值,使输入数据集去中心化(均值为0), 按feature执行
  • samplewise_center:布尔值,使输入数据的每个样本均值为0
  • featurewise_std_normalization:布尔值,将输入除以数据集的标准差以完成标准化, 按feature执行
  • samplewise_std_normalization:布尔值,将输入的每个样本除以其自身的标准差
  • zca_whitening:布尔值,对输入数据施加ZCA白化
  • zca_epsilon: ZCA使用的eposilon,默认1e-6
  • rotation_range:整数,数据提升时图片随机转动的角度
  • width_shift_range:浮点数,图片宽度的某个比例,数据提升时图片水平偏移的幅度
  • height_shift_range:浮点数,图片高度的某个比例,数据提升时图片竖直偏移的幅度
  • shear_range:浮点数,剪切强度(逆时针方向的剪切变换角度)
  • zoom_range:浮点数或形如[lower,upper]的列表,随机缩放的幅度,若为浮点数,则相当于[lower,upper] = [1 - zoom_range, 1+zoom_range]
  • channel_shift_range:浮点数,随机通道偏移的幅度
  • fill_mode:;‘constant’,‘nearest’,‘reflect’或‘wrap’之一,当进行变换时超出边界的点将根据本参数给定的方法进行处理
  • cval:浮点数或整数,当fill_mode=constant时,指定要向超出边界的点填充的值
  • horizontal_flip:布尔值,进行随机水平翻转
  • vertical_flip:布尔值,进行随机竖直翻转
  • rescale: 重放缩因子,默认为None. 如果为None或0则不进行放缩,否则会将该数值乘到数据上(在应用其他变换之前)
  • preprocessing_function: 将被应用于每个输入的函数。该函数将在图片缩放和数据提升之后运行。该函数接受一个参数,为一张图片(秩为3的numpy array),并且输出一个具有相同shape的numpy array
  • data_format:字符串,“channel_first”或“channel_last”之一,代表图像的通道维的位置。该参数是Keras 1.x中的image_dim_ordering,“channel_last”对应原本的“tf”,“channel_first”对应原本的“th”。以128x128的RGB图像为例,“channel_first”应将数据组织为(3,128,128),而“channel_last”应将数据组织为(128,128,3)。该参数的默认值是~/.keras/keras.json中设置的值,若从未设置过,则为“channel_last”
1
2
3
4
5
6
7
8
9
10
11
12
13
14
15
16
17
18
19
20
21
22
23
24
from keras.preprocessing.image import ImageDataGenerator, array_to_img, img_to_array, load_img

datagen = ImageDataGenerator(
rotation_range=40,
width_shift_range=0.2,
height_shift_range=0.2,
rescale=1./255,
shear_range=0.2,
zoom_range=0.2,
horizontal_flip=True,
fill_mode='nearest')

img = load_img('data/train/cats/cat.10.jpg')
x = img_to_array(img)
x = x.reshape((1,) + x.shape) # this is a Numpy array with shape (1, 3, 150, 150)

# the .flow() command below generates batches of randomly transformed images
# and saves the results to the `preview/` directory
i = 0
for batch in datagen.flow(x, batch_size=1,
save_to_dir='preview', save_prefix='cat', save_format='jpeg'):
i += 1
if i > 20:
break # otherwise the generator would loop indefinitely

训练一个小的卷积神经网络

1
2
3
4
5
6
7
8
9
10
11
12
13
14
15
16
17
18
19
20
21
22
23
24
25
26
27
28
29
30
31
32
33
34
35
36
37
from keras.preprocessing.image import ImageDataGenerator
from keras.models import Sequential
from keras.layers import Conv2D, MaxPooling2D
from keras.layers import Activation, Dropout, Flatten, Dense
from keras import backend as K

# dimensions of our images.
img_width, img_height = 150, 150
if K.image_data_format() == 'channels_first':
input_shape = (3, img_width, img_height)
else:
input_shape = (img_width, img_height, 3)

model = Sequential()
model.add(Conv2D(32, (3, 3), input_shape=input_shape))
model.add(Activation('relu'))
model.add(MaxPooling2D(pool_size=(2, 2)))

model.add(Conv2D(32, (3, 3)))
model.add(Activation('relu'))
model.add(MaxPooling2D(pool_size=(2, 2)))

model.add(Conv2D(64, (3, 3)))
model.add(Activation('relu'))
model.add(MaxPooling2D(pool_size=(2, 2)))

model.add(Flatten())
model.add(Dense(64))
model.add(Activation('relu'))
model.add(Dropout(0.5))
model.add(Dense(1))
model.add(Activation('sigmoid'))

model.compile(loss='binary_crossentropy',
optimizer='rmsprop',
metrics=['accuracy'])
model.summary()
1
2
3
4
5
6
7
8
9
10
11
12
13
14
15
16
17
18
19
20
21
22
23
24
25
26
27
28
29
30
31
32
33
34
35
36
37
38
train_data_dir = 'data/train'
validation_data_dir = 'data/val'
nb_train_samples = 12000
nb_validation_samples = 500
epochs = 50
batch_size = 16

# this is the augmentation configuration we will use for training
train_datagen = ImageDataGenerator(
rescale=1. / 255,
shear_range=0.2,
zoom_range=0.2,
horizontal_flip=True)

# this is the augmentation configuration we will use for testing:
# only rescaling
test_datagen = ImageDataGenerator(rescale=1. / 255)

train_generator = train_datagen.flow_from_directory(
train_data_dir,
target_size=(img_width, img_height),
batch_size=batch_size,
class_mode='binary')

validation_generator = test_datagen.flow_from_directory(
validation_data_dir,
target_size=(img_width, img_height),
batch_size=batch_size,
class_mode='binary')

model.fit_generator(
train_generator,
steps_per_epoch=nb_train_samples // batch_size,
epochs=epochs,
validation_data=validation_generator,
validation_steps=nb_validation_samples // batch_size)

model.save_weights('first_try.h5')

权重

1
2
3
4
5
6
7
8
9
10
11
12
13
14
15
16
17
18
19
20
21
22
23
24
25
26
27
28
29
30
31
32
33
34
35
36
37
38
39
40
41
42
43
44
45
46
47
48
49
50
51
52
53
54
55
56
57
58
59
60
61
62
63
64
65
66
67
68
69
70
71
72
73
74
import numpy as np
from keras.preprocessing.image import ImageDataGenerator
from keras.models import Sequential
from keras.layers import Dropout, Flatten, Dense
from keras import applications

# dimensions of our images.
img_width, img_height = 150, 150

top_model_weights_path = 'bottleneck_fc_model.h5'
train_data_dir = 'data/train'
validation_data_dir = 'data/validation'
nb_train_samples = 2000
nb_validation_samples = 800
epochs = 50
batch_size = 16


def save_bottlebeck_features():
datagen = ImageDataGenerator(rescale=1. / 255)

# build the VGG16 network
model = applications.VGG16(include_top=False, weights='imagenet')

generator = datagen.flow_from_directory(
train_data_dir,
target_size=(img_width, img_height),
batch_size=batch_size,
class_mode=None,
shuffle=False)
bottleneck_features_train = model.predict_generator(
generator, nb_train_samples // batch_size)
np.save(open('bottleneck_features_train.npy', 'w'),
bottleneck_features_train)

generator = datagen.flow_from_directory(
validation_data_dir,
target_size=(img_width, img_height),
batch_size=batch_size,
class_mode=None,
shuffle=False)
bottleneck_features_validation = model.predict_generator(
generator, nb_validation_samples // batch_size)
np.save(open('bottleneck_features_validation.npy', 'w'),
bottleneck_features_validation)


def train_top_model():
train_data = np.load(open('bottleneck_features_train.npy'))
train_labels = np.array(
[0] * (nb_train_samples / 2) + [1] * (nb_train_samples / 2))

validation_data = np.load(open('bottleneck_features_validation.npy'))
validation_labels = np.array(
[0] * (nb_validation_samples / 2) + [1] * (nb_validation_samples / 2))

model = Sequential()
model.add(Flatten(input_shape=train_data.shape[1:]))
model.add(Dense(256, activation='relu'))
model.add(Dropout(0.5))
model.add(Dense(1, activation='sigmoid'))

model.compile(optimizer='rmsprop',
loss='binary_crossentropy', metrics=['accuracy'])

model.fit(train_data, train_labels,
epochs=epochs,
batch_size=batch_size,
validation_data=(validation_data, validation_labels))
model.save_weights(top_model_weights_path)


save_bottlebeck_features()
train_top_model()
1
2
3
4
5
6
7
8
9
10
11
12
13
14
15
16
17
18
19
20
21
22
23
24
25
26
27
28
29
30
31
32
33
34
35
36
37
38
39
40
41
42
43
44
45
46
47
48
49
50
51
52
53
54
55
56
57
58
59
60
61
62
63
64
65
66
67
68
69
70
71
72
73
74
75
76
77
from keras import applications
from keras.preprocessing.image import ImageDataGenerator
from keras import optimizers
from keras.models import Sequential
from keras.layers import Dropout, Flatten, Dense

# path to the model weights files.
weights_path = '../keras/examples/vgg16_weights.h5'
top_model_weights_path = 'fc_model.h5'
# dimensions of our images.
img_width, img_height = 150, 150

train_data_dir = 'cats_and_dogs_small/train'
validation_data_dir = 'cats_and_dogs_small/validation'
nb_train_samples = 2000
nb_validation_samples = 800
epochs = 50
batch_size = 16

# build the VGG16 network
model = applications.VGG16(weights='imagenet', include_top=False)
print('Model loaded.')

# build a classifier model to put on top of the convolutional model
top_model = Sequential()
top_model.add(Flatten(input_shape=model.output_shape[1:]))
top_model.add(Dense(256, activation='relu'))
top_model.add(Dropout(0.5))
top_model.add(Dense(1, activation='sigmoid'))

# note that it is necessary to start with a fully-trained
# classifier, including the top classifier,
# in order to successfully do fine-tuning
top_model.load_weights(top_model_weights_path)

# add the model on top of the convolutional base
model.add(top_model)

# set the first 25 layers (up to the last conv block)
# to non-trainable (weights will not be updated)
for layer in model.layers[:25]:
layer.trainable = False

# compile the model with a SGD/momentum optimizer
# and a very slow learning rate.
model.compile(loss='binary_crossentropy',
optimizer=optimizers.SGD(lr=1e-4, momentum=0.9),
metrics=['accuracy'])

# prepare data augmentation configuration
train_datagen = ImageDataGenerator(
rescale=1. / 255,
shear_range=0.2,
zoom_range=0.2,
horizontal_flip=True)

test_datagen = ImageDataGenerator(rescale=1. / 255)

train_generator = train_datagen.flow_from_directory(
train_data_dir,
target_size=(img_height, img_width),
batch_size=batch_size,
class_mode='binary')

validation_generator = test_datagen.flow_from_directory(
validation_data_dir,
target_size=(img_height, img_width),
batch_size=batch_size,
class_mode='binary')

# fine-tune the model
model.fit_generator(
train_generator,
samples_per_epoch=nb_train_samples,
epochs=epochs,
validation_data=validation_generator,
nb_val_samples=nb_validation_samples)

Show, Attend and Tell: Neural Image Caption Generation with Visual Attention论文学习

Posted on 2018-11-15 | | Visitors:

SGM: Sequence Generation Model for Multi-Label Classification论文学习

Posted on 2018-10-26 | In 论文学习 | | Visitors:

SGM: Sequence Generation Model for Multi-Label Classification论文学习

Abstract

  • 1、先介绍背景 ;
    多标签分类在nlp领域具有很大挑战性,而且标签之间往往有关系,这比单个标签分类难多了;
  • 2、介绍已有研究主要存在的问题 ;
    2.1 现有方法经常忽略标签间的关系;
    2.2 现有方法没有考虑文本的不同部分预测标签的贡献不一样;
  • 3、简要概括自己提出的方法 ;
    将多标签任务视为序列生成问题,应用序列生成模型,一种比较创新的解码器结构来解决。
  • 4、说明实验结果并简要分析 ;
    大量实验结果表明,提出的方法在很大程度上优于以前的工作。 对实验结果的进一步分析表明,所提出的方法不仅捕获标签之间的相关性,而且在预测不同标签时自动选择信息量最大的单词。

1 Introduction

1、具体解释多标签分类问题是什么;
2、介绍之前传统机器学习的劣势:
(1)Binary relevence (BR) : 忽略了标签的相关性;
(2)Classifier chains(CC): 考虑标签的相关性,将多标签转化为链式二分类,计算量太大;
(3)ML-KNN:捕捉一阶或两阶标签相关性,在高阶标签相关性计算复杂度过高;
3、神经网络方法:
(1)they either neglect the correlations between labels or do not consider differences in the contributions of textual content when predicting labels
4、大概讲讲怎么启发想到这个方法,简要描述这个方法,并说明这个方法解决什么问题有什么效果。最后列举贡献点
(1)提出的解码器采用序列生成模型,能够捕捉标签间的相关性还有自动获取最有用的信息来预测不同的标签;
(2)大量实验表明这个方法优于其他方法,进一步的分析说明了所提出方法能有效表示标签间的相关性
5、说明论文结构

2 Proposed Method

2.1 Overview

y*是要预测的序列标签,要最大化条件概率p(y|x):
$$ p(y|x) = \prod_{i=0}^n p(y_i|y_1,y_2,..,y_{i-1}) $$
将训练集中按照标签的频率排序,频率搞得排前面。

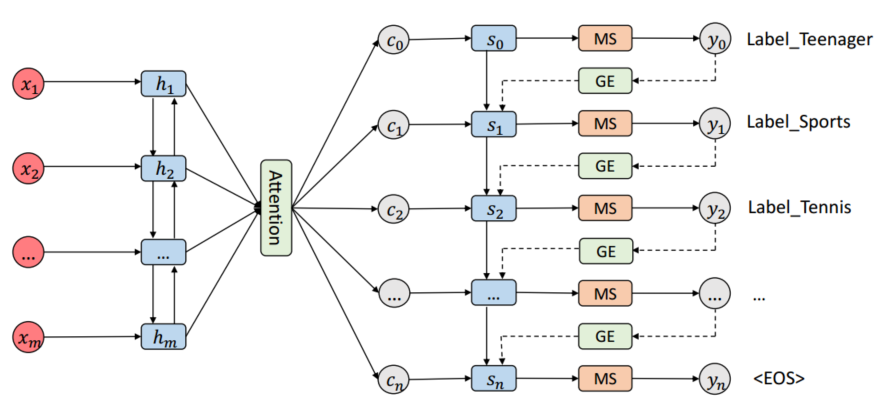
模型框架

MS denotes the masked softmax layer. GE denotes the global embedding

The text sequence x is encoded to the the hidden states, which are aggregated to a context vectorct by the attention mechanism at time-step t. The decoder takes the context vector ct, the last hidden state st−1 of the decoder and the embedding vector g(yt−1) as the inputs to produce the hidden state st at time-step t. Here yt−1 is the predicted probability distribution over the label space L at time-step t − 1. The function g takes yt−1 as input and produces the embedding vector which is then passed to the decoder. Finally, the masked softmax layer is used to output the probability distribution yt.

2.2 Sequence Generation

Encoder:
$ (w_1,w_2,..,w_m) $是有$ m $个词的一句话,用one-hot表示,$w_i$经过word-embedding变成$x_i$,然后用双向的LSTM读取$x$,计算每个单词的隐藏层的状态,如下:

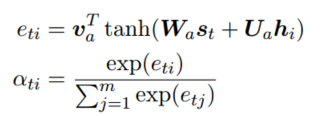
Attention:


Decoder:


2.3 Global Embedding

3 Experiments

3.1 Dataset

公开数据集合私有数据集做的实验,这样更有说服力

3.2 Evaluation Metrics

Hamming-loss和Micro-F1

3.3 Details

网络参数的介绍
adam

3.4 Baseline

介绍列举以前的方法作为baseline

3.5 Results

3.6 Analysis and Discussion

global embedding加进去效果提升很多;
mask用来阻止预测重复的标签;
标签的排序也很有效;
可视化attention;

Word2vec学习

Posted on 2018-10-23 | | Visitors:

cs231n自己笔记翻译Image Classification

Posted on 2018-10-16 | In cs231n学习笔记 | | Visitors:

Image Classification

困难挑战

  • 视角变化(viewpoint variation) ;
  • 大小变化(Scale variation) ;
  • 形变(Deformation) ;
  • 遮挡(Occlusion) ;
  • 光照条件(viewpoint variation) ;
  • 背景干扰(Scale variation) ;
  • 类内差异(viewpoint variation) ;

L1和L2比较

L2距离更倾向接受多个中等程度的差异。[p-norm](https://planetmath.org/vectorpnorm)

k-Nearest Neighbor分类器

它的思想很简单:与其只找最相近的那1个图片的标签,我们找最相似的k个图片的标签,然后让他们针对测试图片进行投票,最后把票数最高的标签作为对测试图片的预测。所以当k=1的时候,k-Nearest Neighbor分类器就是Nearest Neighbor分类器。从直观感受上就可以看到,更高的k值可以让分类的效果更平滑,使得分类器对于异常值更有抵抗力。

Nearest Neighbor分类器的优劣

首先,Nearest Neighbor分类器易于理解,实现简单。其次,算法的训练不需要花时间,因为其训练过程只是将训练集数据存储起来。然而测试要花费大量时间计算,因为每个测试图像需要和所有存储的训练图像进行比较,这显然是一个缺点。在实际应用中,我们关注测试效率远远高于训练效率。其实,我们后续要学习的卷积神经网络在这个权衡上走到了另一个极端:虽然训练花费很多时间,但是一旦训练完成,对新的测试数据进行分类非常快。这样的模式就符合实际使用需求。
Nearest Neighbor分类器在某些特定情况(比如数据维度较低)下,可能是不错的选择。但是在实际的图像分类工作中,很少使用。因为图像都是高维度数据(他们通常包含很多像素),而高维度向量之间的距离通常是反直觉的。

实际应用k-NN

  1. 预处理你的数据:对你数据中的特征进行归一化(normalize),让其具有零平均值(zero mean)和单位方差(unit variance)。在后面的小节我们会讨论这些细节。本小节不讨论,是因为图像中的像素都是同质的,不会表现出较大的差异分布,也就不需要标准化处理了。
  2. 如果数据是高维数据,考虑使用降维方法,比如PCA(wiki ref, CS229ref, blog ref)或随机投影。
  3. 将数据随机分入训练集和验证集。按照一般规律,70%-90% 数据作为训练集。这个比例根据算法中有多少超参数,以及这些超参数对于算法的预期影响来决定。如果需要预测的超参数很多,那么就应该使用更大的验证集来有效地估计它们。如果担心验证集数量不够,那么就尝试交叉验证方法。如果计算资源足够,使用交叉验证总是更加安全的(份数越多,效果越好,也更耗费计算资源)。
  4. 在验证集上调优,尝试足够多的k值,尝试L1和L2两种范数计算方式。
  5. 如果分类器跑得太慢,尝试使用Approximate Nearest Neighbor库(比如FLANN)来加速这个过程,其代价是降低一些准确率。
  6. 对最优的超参数做记录。记录最优参数后,是否应该让使用最优参数的算法在完整的训练集上运行并再次训练呢?因为如果把验证集重新放回到训练集中(自然训练集的数据量就又变大了),有可能最优参数又会有所变化。在实践中,不要这样做。千万不要在最终的分类器中使用验证集数据,这样做会破坏对于最优参数的估计。直接使用测试集来测试用最优参数设置好的最优模型,得到测试集数据的分类准确率,并以此作为你的kNN分类器在该数据上的性能表现。

TF-IDF原理

Posted on 2018-10-02 | | Visitors:

Hello Blog

Posted on 2018-08-17 | In 论文学习 | | Visitors:

经历了博客园和CSDN写博客,今天也开始手痒搭建用hexo+githubpage搭建个人博客了,CSDN应该也会继续保留使用。希望自己保持一颗学习的心。

Read more »
Owen

Owen

Fear can hold you prisoner. Hope can set you free.

7 posts
3 categories
4 tags
GitHub
© 2019 Owen
Powered by
|
Theme